top of page

|
|
Add a Client, Venue, and Event
Most of our clients (Informa, GreeBiz, Visa, etc.) and venues where we work already exist in Conductor. You can view the lists in the respective locations. This guide explains the process of creating a new client, venue, and event and how to attach the first two to an event, allowing you to start inputting items into the system.
CREATE A NEW CLIENT:
1. Hover over ADMIN (in the main menu, top right) until the Admin Menu appears and click on Clients.
2. Click on the + sign at the far right of the Clients panel.
3. Fill in any necessary fields. General fields may be left blank if not required.
4. Review the Client information for accuracy.
5. Click on SAVE at the bottom right corner of the window.
CREATE A NEW VENUE:
1. Hover over ADMIN (in the main menu, top right) until the Admin Menu appears and click on Venues.
2. Click on the + sign at the far right of the Venues panel.
3. Fill in any necessary fields. General fields may be left blank if not required.
4. Review the Venue information for accuracy.
5. Click on SAVE at the bottom right corner of the window.
CREATE A NEW EVENT AND ATTACH THE CLIENT AND VENUE TO IT:
1. Hover over EVENTS (in the main menu, top right) until the Admin Menu appears and click on Events.
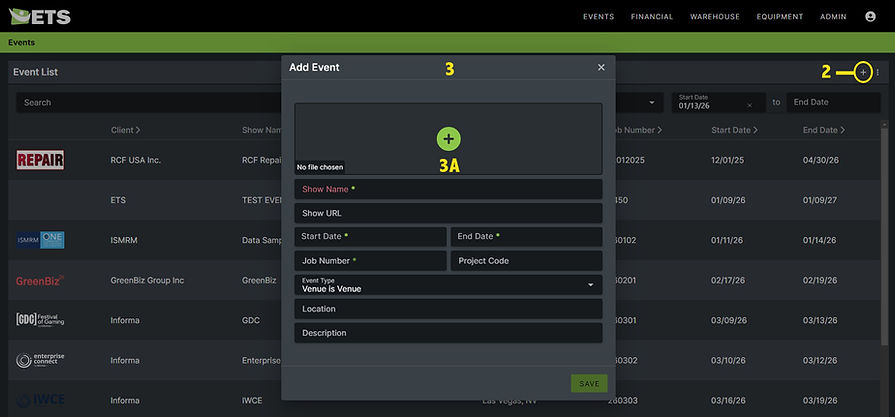
2. Click on the + sign at the far right of the Event List panel. (See image below.)
3. In the Add Event window, enter all necessary information: (See image below.)
A. The first field (with the + sign in the green circle) is for event logo uploading.
B. For Show Name, if it's a show we work on annually, be sure to include the current year.
C. On another browser tab, locate the show's official website, copy the web address and paste it into the Show URL field.
D. If you don't know the Job Number for your show, ask Carly. The Job Number and Project Code are the same.
E. Under Event Type, select "Venue is Venue" from the pull-down menu.
4. Once you have completed all of the fields and reviewed for accuracy, click on SAVE in the bottom right corner.
5. Find your event in the list and double-click on it.
6. Click on the + sign to the right of the Clients panel at left. (See image below.)
7. Select your Client and Contact from the lists in the pull-down menus. (See image below.)
8. When finished filling all fields, click on SAVE in the bottom right corner of the window.
9. Click on the green ADD A VENUE button towards the mid-left portion of the screen. (See image below.)

10. In the Add Venue window, select your venue from the drop-down menu in Venue field.
11. When finished filling all fields, click on SAVE in the bottom right corner of the window.
IMPORTANT:
* Always verify the client, venue, event logo, and event dates before
creating the event.
* Always double-check that the client and venue are attached to the correct event.
PROJECT MANAGEMENT
Add a Client / Venue / Event
bottom of page